


If you are frustrated form JavaScript because it doesn't show the errors before running, type mismatch, or dynamic variables, just like me, let's move on to TypeScript a strongly typed programming language that builds on JavaScript, giving you better tooling at any scale.
If you want to refer to the code in this article, please follow the below link
github.com/debasishbsws/TypeScript-Express-..
For this article, I assume that you're somewhat familiar with NodeJS. And today we will be creating our Express app, setup the EJS view engine, and creating the simple template that we can use to start any node project.
Create the NodeJS project
Open up your terminal of shell window and run
npm init -y
Hopefully, you have NodeJS installed on your computer( If not follow this link ), this command will create a package.json file into your current directory. That file is responsible for the configuration of your NodeJS Project. We will see them in action.
let's install some npm packages we need for our application.
Install Express, EJS and DotENV
In your terminal run
npm install express ejs dotenv
It will create a node_module folder and download all the packages we install from npm(Node Package Manager).
And now if you open up the package.json file and see the dependencies configuration it will be something like
"dependencies": {
    "dotenv": "^16.0.2",
    "ejs": "^3.1.8",
    "express": "^4.18.1"
  },
that means these packages are installed.
Install DevDependencies
As we intended to write the code in TypeScript we need some devDependencies to install, that will helps us to compile our TypeScript code into vanilla JavaScript and create and run our application.
At first, we need typescript
npm install typescript -D
-D is to specify it has to be installed as a Dev Dependency.
We also need the types for node, express & dotenv.
npm install @types/express @types/dotenv @types/node -D
we also need some additional dev dependencies so just install
rimrafts-nodeshelljs@types/shelljs
All of these as devDependencies by specifying -D.
Now in your package.json file, you can see the devDependencies configuration as
"devDependencies": {
    "@types/dotenv": "^8.2.0",
    "@types/express": "^4.17.14",
    "@types/node": "^18.7.18",
    "@types/shelljs": "^0.8.11",
    "nodemon": "^2.0.0",
    "rimraf": "^3.0.2",
    "shelljs": "^0.8.5",
    "ts-node": "^10.9.1",
    "typescript": "^4.8.3"
  }
Let's take a moment and understand. The various @types/ node packages that you see are the type definitions that the TypeScript transpiler will depend on.
The shelljs node package gives you shell-like commands that you can use in TypeScript. You'll use this package to copy transpiled files into a folder from where the Web application can be served.
The nodemon node package allows you to restart your application if the underlying files change. I'll use this for debug purposes, the idea being, that as I edit a file, the build will automatically run and allow me to see changes in the browser.
rimraf allows you to delete a bunch of files easily and you'll use this to clean your project. And the final two, ts-node and typescript are for TypeScript support.
Before moving to the scripts we need, let's set up our project structure first.
Project Structure Set up
Before you can start working on your ExpressJS application, let's define the environment and the various configuration details that the ExpressJS application depends on.
The first thing you need is an environment file, which includes the basic configuration settings, such as what port the application will run on. Because I have taken a dependency on dotnev for this, I simply create a .env file at the root of the project with the following contents:
PORT=3000
HOST_URL=http://localhost:3000
also, create a .gitignore file that will keep all unnecessary files from version control tracking.
fill your .gitignore with
# dependencies
/node_modules

# production
/build
/dist

# local env files
.env*.local
.env

# IDE editor
.idea
.vscode/
Next, you need tsconfig.json to configure your TypeScript
npx tsc init
it will create a tsconfig.json file in your root and check this
{
    "compilerOptions": {
        "module": "commonjs",
        "esModuleInterop": true,
        "target": "es2016",
        "noImplicitAny": true,
        "moduleResolution": "node",
        "sourceMap": true,
        "outDir": "./build",
        "noEmitOnError": true,
        "baseUrl": ".",
        "paths": {
            "*": [
                "node_modules/*",
                "src/types/*"
            ]
        }
    },
    "include": [ "src/**/*" ],
    "exclude": ["buildBeforeRun", "src/**/*.test.ts", "src/**/*.spec.ts", "src/public" ]
}
As you can see this is a fairly simple tsconfig.json. I'm targeting commonjs and excluding paths, I don't want to be compiled. Note that I've also given a hint to include node_modules and src/types, without which the TypeScript transpilation would fail. "outDir": "./build" define that where our JS code resides after compilation. And you can ignore the rest for now.
Start Writing the Application
There are many ways to structure your nodeJS project but you can follow the steps.
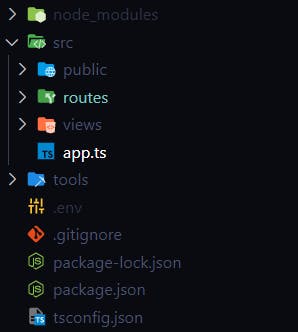
- Create two folders on root
src&tools - inside
srccreatepublic,routs&viewsfolder. - also create a file
app.tsinsidesrcwhich will be our entry point.
Your file structure should look like this
views folder will contain all the *.ejs file that has to be rendered like: index.ejs, about.ejs.
**Example index.ejs:
<!DOCTYPE html>
<html lang="en">

<head>
    <meta charset="utf-8">
    <title>ExpressJS TypeScript starter template</title>
</head>

<body>
 <h1>Header</h1>Home</a>|<a href="/about">About
        <h1>Home Page</h1>
</body>

</html>
public folder will contain all the static files you need to serve into the browser like *.css, images, *.js, etc.
routes folder has all the route handlers for your API, user, etc;
let create user.ts inside the routes folder and put
import { Application, Request, Response, Router } from "express";
const router = Router();

router.get("/", (req: Request, res: Response): void => {
        res.render("index");
});

export default router;
Now fill our app.ts file with :
import dotenv from "dotenv";
dotenv.config();
import express, {Application, Request, Response, urlencoded, NextFunction} from "express";
import path from "path";

import usersRouter from './routes/users';

const PORT = process.env.SERVER_PORT;
const app: Application = express();

app.use(express.json());
//view engine setup
app.set("views", path.join(__dirname, "views"));
app.set("view engine", "ejs");

app.use(express.json());
app.use(express.urlencoded({ extended: false }));

//serve static files
app.use(express.static(path.join(__dirname, "public")));

app.use('/users', usersRouter);

//app set up to listen the port
app.listen(PORT, () => {
    console.log(`Server running in port ${PORT}`);
});
You're going to need some mechanism to build the application during debug time. One part of the build is the TypeScript transpilation, but the second part is copying over the static assets, such as CSS, JavaScript, images, etc., that don't need transpilation. You're going to put all of those in the public folder. These files need to be copied from the src folder and copied into the build folder at runtime. To facilitate that, go ahead and create a file called copyAssets.ts in the tools folder. I'm simply cleaning up and copying files as the application runs.
import * as shell from "shelljs";
// Copy all the view templates and assets in the public folder
shell.cp("-R", ["src/views", "src/public"], "build/");

// Remove unnecessary files
shell.rm(["build/public/js/*.ts", "build/public/js/*.json"]);
Run and Build Application
Now we are ready to fill our scripts inside package.json
To begin, add a “main” entry in the package.json, as shown:
"main": "./build/app.js",
This informs the host that when this project is asked to run, you should run the build/app.js file.
OK replace the "scripts":{ } with
"scripts": {
    "start": "npm run build && node .",
    "dev": "nodemon -L src/app.ts",
    "build": "npm run clean && npm run tsc && npm run copy-assets",
    "copy-assets": "ts-node tools/copyAssets",
    "tsc": "npx tsc",
    "clean": "rimraf build/*"
  },
Let us understand what we are doing here
"clean": "rimraf build/*": This is for cleaning the build folder after every changes you made in the code."tsc": "npx tsc": This will transpile all the*.tsfile and put it in a folder calledbuild"copy-assets": "ts-node tools/copyAssets": This runs thecopyAssets.tsfile usingts-nodeand copypublic&viewsfolder into thebuildfolder."build": "npm run clean && npm run tsc && npm run copy-assets": This runs all the scripts one by one and builds the application for us."dev": "nodemon -L src/app.ts": we start our server in development mode bynodemontargeting thesrc/app.tsas an entry point."start": "npm run build && node .": This script runbuildandnode .so it is basically building the application first and then starting the application using the main entry point which isbuild/app.js.
While Developing our application we don't want to build and run the JS files after compilation and moving all the Assets from src to build, and we also want to automatically restart our server after every time we made a change in our ts and ejs file.
"dev": "nodemon -L src/app.ts": runs TypeScript code directly and starts our server in development mode bynodemontargeting thesrc/app.tsas an entry point.
Run Your Application
Now for the most fun part. To run the application, type the following command at the terminal:
npm start
Once your application is built and deployed, you should see the following in your console:
Server running in port 3000
We can also run our server in Development mode without building the application by typing the following command at the terminal:
npm run dev
Now open your favorite browser and visit localhost:3000. Your application can be seen running.
Conclusion
In this article, I showed how you start your ExpressJS and TypeScript-based project.
I hope that this article helped you get started with Express.js and TypeScript. If you are still not sure about how to start your project, I recommend that you check out the Express.js documentation and the TypeScript documentation for more information. If you have any questions, feel free to contact me on Twitter @debasishbsws.